Monday, September 17, 2018

Sewing Sisters - All About Needles

Our first Sewing Sisters event was held this past Saturday.  As Diane A said - 'What can you possibly teach me about needles? ' Well, Diane was pleasantly surprised after the class was over as she learned a number of invaluable tips regarding sewing machine needles.

I learned an invaluable tip as well from Linda B and I am going to share it first in this blog post.  I have been throwing away all of my used sewing machine needles- 'oy, the clutter'.  But no more.  

In the Hari-Kuyo ceremony, Japanese women gather once a year on February 8th at Shinto shrines or Buddhist temples to thank their worn out needles and pins for good service.

The celebration is known as the Festival of Broken Needles. The burial of the needles is meant to bring rest to the needles and give thanks for their service. Also another aspect is to give value to the 'small things' and not be wasteful. So now I will save my needles in a container and bury them on February 8, 2019 and celebrate their part in my creative inspiration.

I shared a few Pfaff projects from the blog post. One of my favorite is this 'Needle Minder project' from Melanie L.  Her suggestions are to use the pocket to hold the 'MyPad for Needles" organizer and create little pockets to hold your package of needles.  I added the lettering for my favorite varieties with my Pfaff icon machine. You can find the link for the project HERE. The link includes both the printed directions and the embroidery design.


Several of these are still available- you can pick one up at Scrap & Sew today!

I also featured the Cutwork needles (Teacher's Pet) and Two free projects from Pfaff.

HERE is the link to the Pillowcase project.  This is my version of the pillowcase, a perfect addition to my spare bedroom.


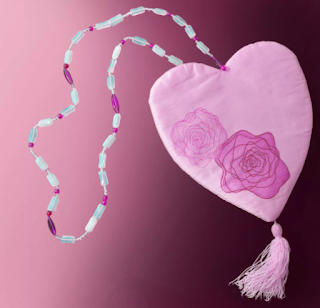
Another great cutwork project from the Pfaff blog can be found HERE.  


Last, but not least is my finished project from a Karen Charles event.  In this section I demonstrated how to sew pintucks with the Five Groove Pintuck foot and a 2.5 twin needle. Sandy C. suggested this should be a class and my creative is spinning on this one.


 It looked a little dull so I added the paint with the Tsuneko paints.


Here is another pintuck sample using a 6.0 twin needle on a blank hand towel.  The top design is an embroidery design found in the Premier+2 software.  The bottom are stitches from the Pfaff icon.


This lecture/demo is free to everyone and the next one will be "Going in Circles" on October 20th from 10-12:00 p.m.  You do not want to miss it!


Saturday, September 8, 2018

Welcome to Fall 2018 Class Preview at Scrap & Sew!

Yes, indeed we are a wild bunch but we are having so much fun and we want you to join in on our frivolity! 


Minnie wants to join the fun as well!


Sarah and Mickey welcome you to our clubhouse!  But wait, there is so much more!  Here is the staff at Scrap & Sew ready to inspire and encourage you!


But what we need are 'Mouseketeers' and they are waiting for us to begin the festivities!  Check them out!

So the party begins!

Lori, our fabulous new owner welcomes everyone to the event. She has updated the store and made it look fresh and new, yet at the same time leaving the feel of the original Scrap and Sew.

But decorating alone does not make the difference to the success of the store.  It is you, our customers and we are so thankful for all of you. The teachers make a difference.  Our teachers inspire you and welcome you to our new fall schedule.

Lori will be teaching an Edge to eEge quilting class.  This class is perfect to practice your quilting in the hoop and the magnetic hoop is the best choice for this class.   Don't forget to buy extra magnets!


(Photo courtesy of Patricia Washam Gourieux)

How clever is this? Bat Moon Rising with Lori is ideal for practicing you curved piecing techniques.


Do you own an embroidery machine? Then we have classes for you!  Starting in September we will have TWO Embroidery Clubs per month.  The Monday line-up will be for any brand of embroidery machine, even if you bought your machine elsewhere. Our Icon and Epic Divas will have their very own class on Saturday  or Wednesday mornings. Adeline has a great line-up and it is possible to embroider two projects a month.


Cindy is our Premier software educator.  She is going to dazzle you with several new fall projects  for your holiday celebrations.


Tess and her daughter Abigail will both be teaching classes this fall. Abigail will be teaching two small quilting projects for the holidays.
Tess has updated her bag for the holidays and is teaching a unique method for making the Card Trick quilt.

Dominque is sharing her very creative serger cover with our group.  She will share this creativity again by teaching a very versatile fabric box with tons of possibilities. 

Theresa is teaching an 'oh-so' cute penguin quilt.


I hope you enjoyed this event as much as we did.  You can always count on Scrap & Sew for a good time!  We hope to see you all soon!


Monday, September 3, 2018

Tissue Box Thread Catcher tutorial

These thread catcher boxes are a perfect addition to your sewing space.  If you are like me, I have threads and small scraps all over the place.  To neaten up my sewing area, I stitched one and keep it right next to my icon.

If you missed getting your free pattern at class preview, stop by the store and pick one up.  If you do not live in the area, I have the pattern dimensions listed below.


9.25" from fold to cut edge


8.5" from top edge to bottom and 2" boxes cut in the corners.


Supplies: (this makes 2 tissue box thread catchers)
1 Fat quarter
Aurifil thread for construction
Empty upright tissue box.

Step #1- Fold the FQ vertically so it measures 9" x 22"


Step #2 - Pin the pattern close to the top and cut out pattern.  Re-pin the pattern again and cut out your second cover.

Step #3 -Press top hem 1/4 " , then 1/4 " again.  Pressing now makes it easier to topstitch in step #5.


Step #4 - Stitch back seam with a 1/4" seam, reversing at each end.  Press to one side.

Step #5 - Stitch the top hem, stitching close to the folded edge.


Step #6 - Fold the fabric right sides together so the raw edge of the bottom seams match.  Stitch with a 1/4 "  seam.  Reverse at each end.


Step #7 - With right sides together, line up the back seam with the bottom seam and stitch 1/4 ".  Repeat with the other bottom seam.


Step #8- Turn right side out and insert empty tissue box.


Set it next to your machine and throw all of your thread snips in here.  Believe me, your floor with thank you!


Make it SEW!


Happy Valentine's Day!

Well, not exactly but it is on the horizon.  This is my second favorite holiday and I love making all of the heart designs and of course the...